Cherry Cheesecake Dessert
Cherry cheesecake is a classic dessert beloved for its creamy texture, sweet-tart topping, and crunchy base. Whether you’re preparing it for a holiday gathering, family dinner, or just as a treat for yourself, this no-bake version is both simple and satisfying. With a graham cracker or digestive biscuit crust, a smooth cream cheese filling, and a bright cherry topping, it’s a dessert that never fails to please.
This version of cherry cheesecake is ideal for home bakers of any skill level. It doesn’t require baking, special pans, or water baths—just a little patience while it sets in the fridge. Each bite offers a perfect balance of buttery crunch, silky richness, and fruity sweetness.
In this guide, we’ll walk through the steps of creating this crowd-pleasing dessert from scratch using easily available ingredients. You’ll also learn useful tips, possible variations, and the best ways to store or serve your cheesecake. Let’s dive into the delicious world of cherry cheesecake.
Ingredients Overview
To make this dessert, you’ll need ingredients divided into three basic components: the crust, the filling, and the topping. Each part is essential to achieving the ideal texture and taste.
Crust Ingredients
- 2 cups graham cracker crumbs or digestive biscuit crumbs (about 200g)
- 1/2 cup melted butter (about 115g)
- 2 tablespoons sugar (optional, for a sweeter base)
Filling Ingredients
- 450g cream cheese, softened (about 2 cups)
- 1 cup heavy cream or whipped topping (about 240ml)
- 3/4 cup powdered sugar (about 90g)
- 1 teaspoon vanilla extract
Topping Ingredients
- 1 can cherry pie filling (540g or 21 oz)
Step-by-Step Instructions
Step 1: Preparing the Crust
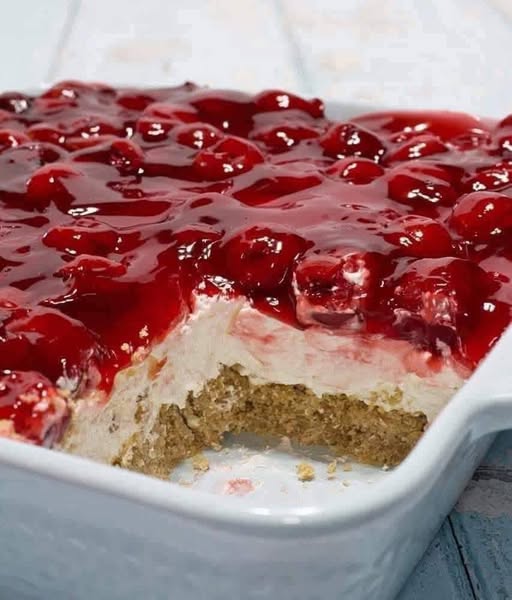
Begin by preparing your crust, which will serve as the base of your cheesecake. In a medium bowl, combine the graham cracker crumbs (or digestive biscuit crumbs), melted butter, and sugar. Mix until the crumbs are fully coated in the butter and resemble damp sand.
Pour the crumb mixture into a 9-inch (23 cm) springform pan or a deep pie dish. Press the mixture down firmly using the bottom of a glass or measuring cup to ensure an even, compact crust. Press some of the mixture slightly up the sides of the pan if desired for added structure.
Once the crust is well packed, place it in the refrigerator to chill for at least 15–20 minutes while you prepare the filling. This helps solidify the butter and keeps the crust from crumbling when the cheesecake is sliced.
Step 2: Making the Creamy Filling
In a large mixing bowl, beat the softened cream cheese with a hand mixer or stand mixer until completely smooth. Make sure there are no lumps, as these can affect the final texture.
Gradually add the powdered sugar, continuing to beat until the mixture is light and fluffy. Add the vanilla extract and mix again to combine.
In a separate bowl, whip the heavy cream until soft peaks form. If you’re using whipped topping, make sure it’s fully thawed and fluffy. Gently fold the whipped cream into the cream cheese mixture using a spatula. This step is important—folding instead of mixing preserves the lightness and ensures a smooth, mousse-like filling.
Once the filling is fully combined and smooth, spoon it over the chilled crust. Use a spatula to smooth out the top evenly. Return the pan to the refrigerator and let the cheesecake chill for at least 4–6 hours, or overnight for best results.
Step 3: Adding the Cherry Topping
Once the filling has set and feels firm to the touch, it’s time for the final layer: the cherry topping.
Open the can of cherry pie filling and gently spoon it over the surface of the cheesecake. Use a spoon or spatula to spread the cherries evenly over the top, ensuring full coverage but being careful not to press down and disturb the filling.
The bright red cherries add a pop of color and a sweet contrast to the creamy base, making the dessert visually appealing as well as delicious.
Step 4: Serving the Cheesecake
Once topped, return the cheesecake to the refrigerator for another 30–60 minutes to let the cherry topping settle slightly. Before serving, you can run a knife along the inside edge of the pan to loosen the dessert, then carefully remove the sides of the springform pan.
Use a sharp knife to slice the cheesecake cleanly. For best results, dip the knife in hot water and wipe it dry before each cut. This helps achieve neat, tidy slices with minimal mess.
Serve chilled, and store any leftovers in the refrigerator for up to 5 days.
Tips and Tricks
- Use Room Temperature Ingredients
Make sure your cream cheese is fully softened before beating. Cold cream cheese can create lumps and prevent the filling from becoming silky smooth. - Avoid Over-Mixing the Filling
Over-mixing the whipped cream into the cream cheese can deflate the mixture. Fold gently to maintain the light and fluffy consistency. - Customize the Crust
You can use chocolate biscuits, vanilla wafers, or even crushed pretzels for a different twist on the classic crust. - Try Homemade Cherry Topping
If you prefer a less sweet topping or want to use fresh fruit, you can make a simple cherry compote with fresh or frozen cherries, sugar, and a bit of cornstarch. - Make Mini Cheesecakes
Use muffin tins lined with paper cups for mini versions of this dessert. Just divide the crust and filling evenly among the cups, chill, and top individually.
Possible Variations
- Berry Cheesecake
Replace the cherry pie filling with blueberry, raspberry, or mixed berry toppings. Fresh or canned versions both work well. - Chocolate Swirl
Add a chocolate swirl by melting some dark chocolate and drizzling it into the filling before smoothing the surface. Use a toothpick to create a marbled effect. - Citrus Twist
Add lemon or orange zest to the cream cheese mixture for a hint of citrus. It adds a refreshing brightness that pairs beautifully with the cherry topping. - Nutty Crust
Add crushed almonds, pecans, or walnuts to the crust mixture for a nutty flavor and added crunch. - Lighter Version
For a lower-fat option, use light cream cheese and reduced-fat whipped topping. The texture might be slightly softer but still enjoyable.
Storing and Freezing Instructions
Cherry cheesecake stores well in the refrigerator. Cover it loosely with plastic wrap or foil and keep it chilled until ready to serve.
If you’d like to freeze the cheesecake, do so without the cherry topping. Wrap the cake tightly in plastic wrap, then in aluminum foil, and freeze for up to 2 months. Thaw overnight in the refrigerator, then add the cherry topping just before serving.
Individual slices can also be wrapped and frozen separately for a quick dessert anytime.
Serving Suggestions
Serve cherry cheesecake on its own or with a few extra touches for presentation:
- A dollop of whipped cream on top
- A mint leaf garnish
- A sprinkle of shaved chocolate or cookie crumbs around the plate
Pair it with coffee or tea for a satisfying end to a meal.
Why This Cheesecake Works
The beauty of this dessert lies in its balance. The crust offers a buttery crunch, the filling is luxuriously smooth, and the cherry topping brings sweetness and color. It’s a dessert that feels rich and indulgent without being overly complicated to make.
Whether you’re a baking beginner or a seasoned home cook, this cherry cheesecake dessert delivers on flavor, texture, and visual appeal. It’s endlessly customizable and perfect for nearly any occasion.
Final Thoughts
Cherry cheesecake is more than just a dessert—it’s a classic that evokes nostalgia and comfort with every slice. Its no-bake simplicity makes it accessible to everyone, and its vibrant appearance makes it an instant centerpiece at any table.
With a few simple ingredients and a bit of patience while it sets, you’ll be rewarded with a dessert that’s creamy, fruity, and completely irresistible. Once you try this recipe, it’s bound to become a regular favorite in your kitchen.
Whether you’re making it for a celebration or simply craving something sweet, this cherry cheesecake is a delicious reminder that sometimes, the best desserts are the ones made with love, care, and a little creativity.